
Stenciling is an easy, budget-friendly way to personalize your walls or furniture. Start by choosing a stencil that matches your style and securing it firmly with painter’s tape. Dab paint onto the surface using a sponge or stencil brush, working in small sections to prevent bleeding. Keep your strokes light and build coverage gradually for crisp results. With patience and practice, you’ll master simple techniques that make decorating fun and fuss-free—just keep going to discover even more tips.
Key Takeaways
- Choose appropriate stencils and secure them firmly on the surface using painter’s tape.
- Use a sponge or stencil brush to dab paint gently, avoiding excess to prevent bleeding.
- Work in small sections, applying paint in tapping motions for crisp, clean patterns.
- Prepare surfaces by cleaning and priming to ensure smooth application and better adhesion.
- Select high-contrast colors and take your time for precise, professional-looking results.
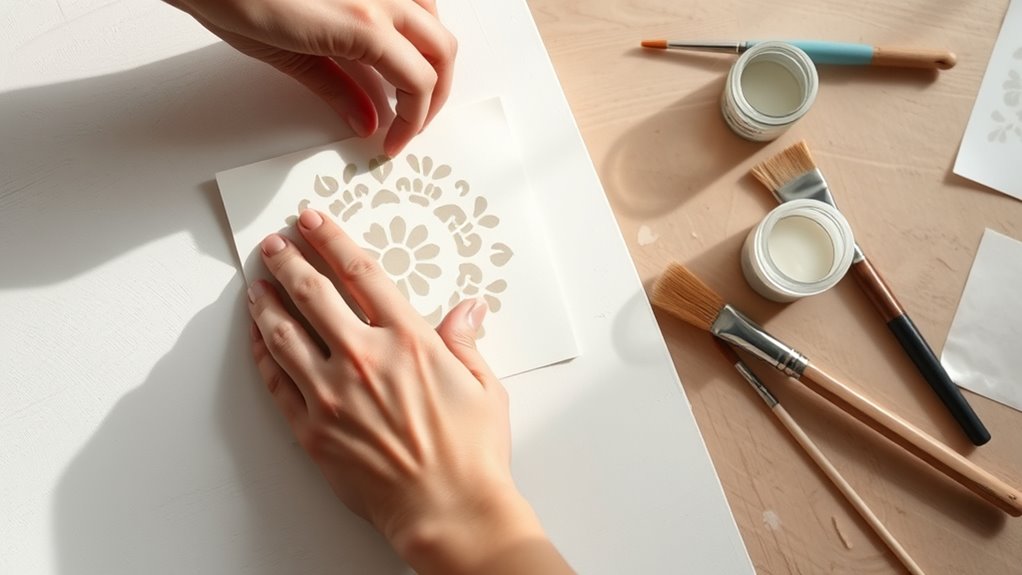
Have you ever wanted to add a personalized touch to your home decor without spending a fortune? Stenciling is a fantastic way to do just that. It allows you to create custom patterns on your walls or furniture, transforming your space with minimal effort and expense. To get started, you’ll want to familiarize yourself with some basic stenciling techniques. These methods help guarantee your designs come out neat and professional-looking, even if you’re new to DIY projects. One popular technique is using a sponge or a stencil brush to dab paint onto the surface. This method prevents excess paint from bleeding under the stencil and gives you more control over the coverage. It’s best to apply the paint in a tapping motion, starting from the center and working outward, which helps maintain crisp edges.
Stenciling offers a neat, customizable way to enhance your home decor easily and affordably.
Choosing stencils is a vital step in achieving the style you want. When selecting stencils, consider the overall theme of your space. Do you prefer intricate, detailed patterns, or are simple, bold shapes more your style? You can find stencils in craft stores, or you might even create your own with a cutting machine or by hand-cutting designs from sturdy paper or plastic sheets. Opt for stencils made from durable materials like mylar or plastic, as they are reusable and easier to clean after each use. Remember, the size of the stencil should match the scale of your project; large patterns work well on big walls or furniture, while smaller designs are perfect for accents or detailed pieces.
Before you start stenciling, prep your surface thoroughly. Clean the area to remove dust and grease, and consider applying a primer if you’re working on a surface that’s uneven or porous. When applying the stencil, secure it with painter’s tape to prevent shifting, which could cause smudges or uneven lines. Use a light hand when applying paint, building up coverage gradually rather than trying to do it all at once. This technique helps avoid paint bleed and results in cleaner lines. If you’re working on a large surface, work in sections to maintain precision. Keep a steady hand and take your time—rushing can lead to mistakes. Additionally, using a stencil with a high contrast pattern and proper color choices can greatly improve the visual impact of color accuracy, especially if you calibrate your paint shades for the best results.
With patience and the right techniques, stenciling can be a simple and rewarding way to express your style. Whether you’re freshening up a single wall or customizing furniture, choosing the right stenciling techniques and stencils makes all the difference. When you master these basics, you’ll find that creating beautiful, personalized patterns is easier than you ever imagined.

Stencils for Painting on Wood, Reusable Flower Stencils Painting Crafts Templates Drawing Stencil for Painting on Wood, Wall, Furniture(18)
【Versatile Stencils】These premium stencils are designed for painting, crafts, and home decor projects. Ideal for various surfaces, including…
As an affiliate, we earn on qualifying purchases.
As an affiliate, we earn on qualifying purchases.
Frequently Asked Questions
What Are the Best Surfaces for Stenciling?
The best surfaces for stenciling are smooth, clean, and well-prepared like walls, furniture, or even fabric. Before you start, make certain proper surface preparation by cleaning and lightly sanding to remove dust or imperfections. Choosing the right stencil is essential; pick one that suits your surface’s material and pattern style. This combination helps your paint adhere better, resulting in crisp, professional-looking designs that last.
How Do I Fix Mistakes During Stenciling?
When you encounter a hiccup during stenciling, don’t fret—think of it as a chance to refine your craft. Use gentle touch-up techniques to carefully correct mistakes, ensuring your design stays flawless. For more stubborn errors, consider stencil repair by lightly sanding or repainting small areas. Patience is key; with a steady hand and a few careful adjustments, your pattern will look seamless and professional in no time.
Can Stenciling Be Done Outdoors?
Yes, you can stencil outdoors, but you need to take into account outdoor durability and weather conditions. Choose weather-resistant paints and sealants to protect your design from rain, sun, and wind. Work in mild weather, avoiding extreme heat or cold, and wait for dry days to ensure proper adhesion. By paying attention to weather considerations, your outdoor stenciling project will last longer and look great.
What Types of Paint Work Best for Stenciling?
You’ll want to choose high-quality acrylic or latex paints for your project, as they provide smooth coverage and easy clean-up. To achieve crisp patterns, use proper brush techniques, applying thin, even coats and avoiding excess paint. Color matching is key; select shades that complement your space. These paints dry quickly, giving you a durable finish, and their versatility makes them perfect for both walls and furniture stenciling.
How Do I Clean Stencils After Use?
To keep your stencils in great shape, you need proper stencil maintenance and cleaning techniques. After each use, gently wash the stencil with warm, soapy water or a mild solvent suitable for your paint type. Use a soft brush or sponge to remove paint without damaging the design. Rinse thoroughly, pat dry with a lint-free cloth, and store flat. Regular cleaning prolongs stencil life and guarantees crisp, clean designs every time.
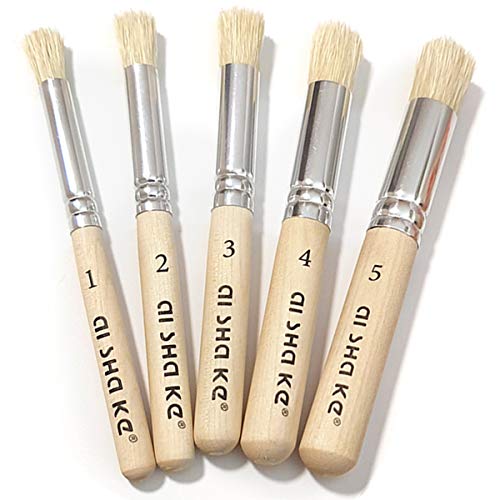
Auhoahsil Stencil Brushes Set, 5 Pcs Natural Bristle Wooden Handle Template Brushes for Wood Wall Model House Painting, Stencil Projects, Card Making, DIY, Crafts and Acrylic Oil Watercolor Painting
5 VARIOUS SIZES OF STENCIL BRUSHES: Set contains 5 versatile stencil brushes with a variety of sizes make…
As an affiliate, we earn on qualifying purchases.
As an affiliate, we earn on qualifying purchases.
Conclusion
Now that you’ve learned how easy it is to add charm with stenciling, imagine the endless possibilities awaiting your creative touch. Each pattern you create is a chance to transform your space into a reflection of your personality. Don’t hold back—your walls and furniture are waiting to tell your story. With a little effort, you’ll turn ordinary into extraordinary, proving that beauty truly begins with your own hands. So, go ahead—stencil your way to a more inspiring home.

DEART Colored Masking Tape Painters Tape Writable 12 or 8 Pack 1 inch or 0.6 Inches Kids Arts Supplies Coding Whiteboard Dry Erase Board Tape Thin Paper Tape Craft Supplies Scrapbook
Value Package: Receive 8 vibrant tapes in a variety of colors, including red, yellow, orange, green, pink, and…
As an affiliate, we earn on qualifying purchases.
As an affiliate, we earn on qualifying purchases.

10PCS 7mil Blank Mylar Stencil Sheets,12X12 inch Milky Translucent PET Blank Stencils Sheets,Template Material for Cutting Machines, Laser Cutting, Food-Safe Craft Plastic
STURDY FOR MAKING REUSABLE STENCILS : 7Mil (0.1778mm / .007") thick, 10 PCS, 12X12 inch/30.5X30.5cm, large and wide…
As an affiliate, we earn on qualifying purchases.
As an affiliate, we earn on qualifying purchases.