
To create a stunning ombre wall, start by choosing 2-4 harmonious colors that gradually shift smoothly from light to dark or hue to hue. Prepare your wall by cleaning and priming it for a flawless finish. Apply the darkest shade at one end and the lightest at the other, blending the edges immediately with a damp sponge or brush while the paint is wet. Using proper techniques and patience, you’ll achieve a seamless gradient—keep going to master the full process.
Key Takeaways
- Select 2-4 harmonious shades that transition smoothly from light to dark or hue-to-hue.
- Prepare and prime the wall thoroughly for better paint adhesion and a cleaner finish.
- Apply the darkest shade at one end and the lightest at the other, blending edges while paint is wet.
- Use tools like damp sponges or dry brushes to feather and soften transitions between colors.
- Step back regularly to evaluate the gradient, touch up harsh lines, and ensure a seamless ombre effect.

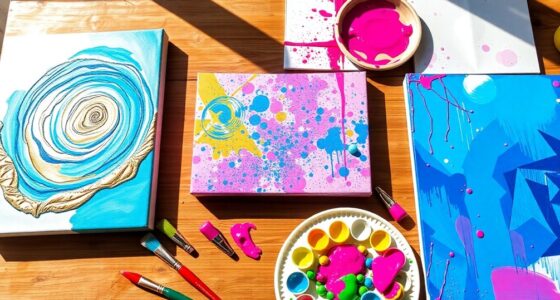
Ombre walls create a stunning gradient effect that adds depth and dimension to any room. When you’re ready to transform your space, mastering the art of color blending and paint techniques is essential. The key to achieving a smooth, seamless gradient lies in understanding how to blend colors effectively and applying the right painting methods. With patience and the right tools, you can create a breathtaking ombre wall that becomes the focal point of your room.
Start by choosing your color palette carefully. Typically, you’ll want to select two to four shades that transition smoothly from light to dark or from one hue to another. Once you’ve picked your colors, plan your gradient. You can decide whether you want a subtle shift or a bold contrast. This planning stage is vital because it influences your entire approach to color blending. When you’re ready to begin, prepare your wall by cleaning and priming it thoroughly. This assures that the paint adheres well and results in a cleaner finish.
Choose a harmonious 2-4 shade palette for smooth, impactful ombre walls.
Next, work on your paint techniques. To create a flawless ombre, you’ll need to blend your colors while they’re still wet. Start by painting the darkest shade at one end of the wall, gradually transitioning to the lightest at the opposite side. Use a large, flat brush or a roller to apply the paint, working in sections. As you move from one color to another, blend the edges where they meet using a damp sponge, a clean brush, or a stippling brush. This technique softens the transition, creating a smooth gradient effect. Keep the colors slightly overlapped and work quickly before the paint dries, which helps avoid harsh lines and uneven blending.
Additionally, understanding the importance of color transition can significantly improve the overall look of your ombre wall, ensuring a more natural flow between shades.
For more control, consider using a spray bottle to mist the blending areas lightly with water. This can help feather the edges and make the transition more natural. If you want an even more refined look, employ a dry brush technique, lightly dragging a clean, dry brush over the wet paint to soften the boundary. Remember, patience is your best friend here. Gradually blending the colors while they’re wet ensures a seamless gradient. You might need to go over some areas multiple times to achieve the perfect transition.
Once you’ve completed the blending, step back and evaluate your work. Touch up any harsh lines or uneven spots with a small brush. Allow the paint to dry completely before adding a second coat or additional touches. With practice and attention to detail, your wall will boast a beautiful, professional-looking ombre effect, showcasing your skill in color blending and paint techniques. This approach transforms a simple wall into an eye-catching feature that elevates your entire space.

VOOMEY 17 Piece Paint Roller Kit – Paint Rollers 9"4", Paint Roller Frame,Paint Trays, Microfiber Roller Cover, Paint Kit for House Painting,Paint Brushes for Painting Walls
PAINTING KIT FOR EFFICIENT WORK: Do you need such a paint roller kit/painting supplies for home that works…
As an affiliate, we earn on qualifying purchases.
As an affiliate, we earn on qualifying purchases.
Frequently Asked Questions
Can Ombre Walls Be Created With Textured or Patterned Paint?
Yes, you can create ombre walls with textured finishes or patterned techniques. Use textured paints or apply a textured glaze to add depth, blending colors seamlessly for a gradient look. For patterns, incorporate stencils or painter’s tape to create designs that fade into each other, enhancing the ombre effect. Just make certain you practice blending and layering to achieve a smooth shift, giving your wall a dynamic, artistic appearance.
What Are the Best Lighting Options to Enhance Ombre Wall Effects?
You should opt for soft, warm lighting options like dimmable LED bulbs or wall sconces to enhance your ombre wall effects. These choices create a cozy ambiance and highlight the gradient’s depth and color shifts. Avoid harsh, direct lighting, as it can wash out the subtle shifts in your ombre design. Instead, use layered lighting to add dimension and make your gradient wall a striking focal point.
How Long Does an Ombre Wall Paint Job Typically Last?
Think of your ombre wall like a cherished photograph; with proper care, it can last years. Typically, a well-painted ombre wall maintains its vibrant gradient for 5-10 years, depending on paint quality and environmental factors. To guarantee longevity, use high-quality paint for durability and follow maintenance tips like gentle cleaning and avoiding harsh chemicals. Regular touch-ups can also keep your gradient looking fresh and stunning over time.
Are There Eco-Friendly or Low-Voc Paints Suitable for Ombre Walls?
Yes, you can choose eco-friendly paints and low VOC options for your ombre walls. These paints minimize harmful fumes and environmental impact while still providing vibrant colors and smooth gradients. Look for brands that specify low VOC or eco-friendly formulations, and guarantee proper ventilation during application. Using these options helps you create a beautiful, sustainable wall design that’s healthier for your home and the planet.
Can Ombre Techniques Be Applied to Ceilings or Furniture?
Imagine your ceiling or furniture transforming into a canvas of flowing color. Yes, you can apply ombre techniques to ceilings and furniture finishes. Ombre ceiling designs add a dreamy gradient sky, while ombre furniture finishes create a stunning fade from light to dark. Use the same blending skills, color choices, and patience to achieve smooth progression, turning ordinary spaces into a visual symphony of color and style.
LAVEVE Knockdown Texture Sponge for Wall and Drywall Patch/Repair – Home Decor DIY Painting Ceiling Wall Texture – 2 Pcs
Main Function: Create decorative imitation sponge painting effect. Our knockdown sponge is intended for small repairs and areas…
As an affiliate, we earn on qualifying purchases.
As an affiliate, we earn on qualifying purchases.
Conclusion
Now that you know how to create stunning ombre walls, you’re ready to transform any room. Imagine a cozy bedroom where soft blue fades into crisp white, instantly calming the space. Just like Emma, who used this technique to make her living room feel more spacious and inviting, you can achieve a personalized, stylish look with patience and practice. So grab your paints and start blending—your perfect gradient wall is just a brushstroke away!

GACDR Face Paint Brush Set,10 Pcs Professional Artist Paint Brushes for Face & Body Painting for Halloween Cosplay Party – Acrylic Painting Oil Gouache Watercolor
🎨 Versatile 7-Style Brush Set Includes round, flat, angle, flibert, dagger, cat's tongue and fine detail brushes to…
As an affiliate, we earn on qualifying purchases.
As an affiliate, we earn on qualifying purchases.

1 Quart Bulls Eye 1-2-3 Primer Sealer Stain Killer
Designed for interior and exterior surfaces
As an affiliate, we earn on qualifying purchases.
As an affiliate, we earn on qualifying purchases.