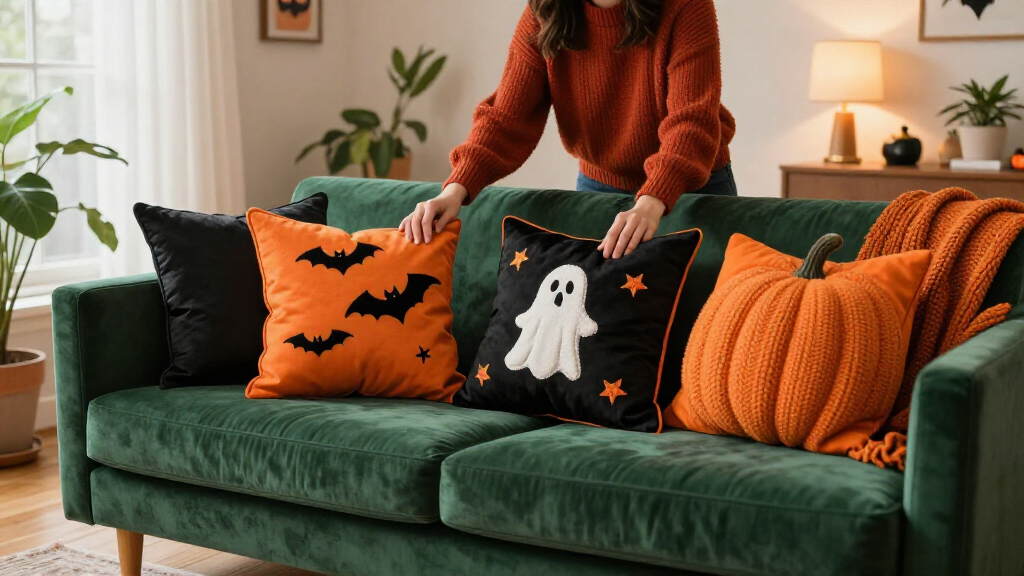

Make spooky Halloween throw pillows by sewing removable covers sized to your existing inserts. This beginner-friendly project uses seasonal fabric, a simple envelope back, and basic straight stitching; you do not need to install a zipper. By the end, you will have two finished covers that fit snugly and can be removed for washing or storage. Allow about 2-3 hours, including measuring, cutting, sewing, and pressing.

Get furniture and decor delivered free — and shop member deals
- Fast, free delivery on millions of items
- Access to Prime Big Deal Days deals on October 6–7
- Prime Video, Amazon Music and more included

Hongsome Halloween Ghost Throw Pillow Covers, Set of 4, 18 x 18 in
- ✔ Quantity: 4 pillow covers
- ✔ Size: 18 x 18 in (45 x 45 cm)
- ✔ Material: Polyester linen

AVOIN colorlife Halloween “Hey Boo” Throw Pillow Covers, Set of 4, 18 x 18 Inch, Black
- ✔ Quantity: 4 pillow covers
- ✔ Dimensions: 18 x 18 inches
- ✔ Material: 100% polyester

AVOIN colorlife Halloween Skull and Skeleton Pillow Covers, 18 x 18 Inch, Set of 4
- ✔ Quantity: 4 pillow covers
- ✔ Dimensions: 18 x 18 inches; fits 18-inch inserts or smaller
- ✔ Material: 100% polyester
Difficulty: Beginner | Time: 2-3 hours for two pillow covers
What You’ll Need
Tools & Materials:
- Sewing machine with a universal needle
- Fabric scissors or rotary cutter and cutting mat
- Measuring tape or ruler
- Straight pins or sewing clips
- Iron and ironing board
- Seam ripper
- Thread in a coordinating color
Knowledge:
- Basic sewing-machine use, including straight stitching and backstitching
- How to measure a pillow insert
- How to cut fabric accurately
For two 18-by-18-inch inserts, buy about 1¼ yards of 44- to 45-inch-wide woven cotton, or enough fabric for your chosen pillow sizes and pattern placement. Choose medium-weight cotton, quilting cotton, or linen; stretchy knits and very slippery satin are harder to sew as a first project. Wash and dry washable fabric before cutting, and check the care label. If you are making a child’s pillow, avoid loose buttons, beads, or other small decorations that could detach.
Hongsome Halloween Ghost Throw Pillow Covers, Set of 4, 18 x 18 in
When we want the room to read as Halloween without relying on a complicated mix of decorations, the Hongsome Ghost set is the most direct fit. Four matching covers repeat one recognizable spooky motif, so they can tie together a sofa, reading nook, or group of chairs. Compared with AVOIN’s “Hey Boo” lettering, this design leans into character rather than words; compared with the skull-and-skeleton set, it keeps a more consistent visual theme.The covers use soft-touch polyester linen with a hidden zipper, and the stated machine-wash care makes seasonal rotation more manageable. The important limitation is the front-only print: if we turn a pillow around or it shifts on the sofa, the plain back will not preserve the ghost design. Inserts are also sold separately, so the four-cover count is not the same as four ready-to-use pillows. This is our best all-around choice for a conventional spooky look, but not for buyers who need the design to show on both sides.
Pros:
- Four matching covers create a coordinated seasonal display.
- Ghost artwork gives the set a clear, traditional Halloween identity.
- Hidden zippers make inserting and removing pillow forms easier.
- Machine-washable polyester linen supports seasonal cleanup.
Cons:
- Pillow inserts are not included.
- The design is printed on the front only.
- The ghost theme is less varied than the skull, cat, moon, and floral set.
Best for: Decorators who want four coordinated, recognizable ghost covers for 18-inch inserts.
Not ideal for: Buyers who want a two-sided pattern, complete pillows with inserts, or a more varied collection of Halloween motifs.
Bottom line: We rank this first for its easy-to-style ghost theme and practical four-cover format, provided a plain back is acceptable.
“We rank this first for its easy-to-style ghost theme and practical four-cover format, provided a plain back is acceptable.”
AVOIN colorlife Halloween “Hey Boo” Throw Pillow Covers, Set of 4, 18 x 18 Inch, Black
The “Hey Boo” set suits a lighter take on spooky décor. Its letter-print theme communicates Halloween without filling the display with several illustrated characters, which makes it a useful alternative when ghost imagery feels too literal or the mixed motifs on the other AVOIN set feel busy. The black color and coordinated covers keep the group visually unified, while the phrase gives the pillows a more playful, greeting-like character.Like the Hongsome option, this is a four-cover set for 18-inch inserts, and its invisible zipper keeps the closure visually discreet. The listed material is soft polyester, and the covers can be machine washed using the specified gentle, cold cycle. Its tradeoff is that typography is the whole idea: shoppers who want skulls, ghosts, or other recognizable Halloween illustrations may find it less atmospheric. As with both other picks, inserts are not included, and the seasonal message is less suited to year-round display than a neutral pattern.
Pros:
- Four covers offer a coordinated look across several seats.
- Letter-print styling keeps the design less visually crowded.
- Invisible zipper closure gives the covers a neat appearance.
- Soft polyester is machine washable with the stated care instructions.
Cons:
- Pillow inserts are not included.
- The “Hey Boo” message is strongly seasonal.
- Lettering offers less character variety than either illustrated set.
Best for: Shoppers who prefer a simple, cheerful Halloween phrase and a coordinated black set over illustrated designs.
Not ideal for: Buyers seeking detailed spooky imagery, a less seasonal pattern, or covers supplied with pillow inserts.
Bottom line: We recommend this set when playful wording matters more than spooky illustrations or a broader mix of motifs.
“We recommend this set when playful wording matters more than spooky illustrations or a broader mix of motifs.”
AVOIN colorlife Halloween Skull and Skeleton Pillow Covers, 18 x 18 Inch, Set of 4
For decorators who want more than one Halloween symbol in the same arrangement, the AVOIN Skull and Skeleton set brings together skull, skeleton, black cat, moon, and floral designs. That gives us more visual variation than either the repeated ghosts from Hongsome or the phrase-led “Hey Boo” set. It makes particular sense when we want the pillows themselves to supply several points of interest rather than relying on a single repeated image.The white color also separates this set from the two black options, so it can create a brighter, more graphic contrast in a room. That difference is useful, but it also means the set may not blend as readily with a dark, traditional Halloween palette. It includes four machine-washable polyester covers with invisible zippers, sized for 18-inch inserts or smaller. Inserts are not included, and the hand-sewn covers may vary by about 1 cm; buyers who want exact uniformity should favor the more straightforward Hongsome or “Hey Boo” options. We place this third because its broader motif mix is appealing but less consistent in look and stated fit.
Pros:
- Four covers feature a mix of skull, skeleton, black cat, moon, and floral artwork.
- White coloring provides a different look from the two black sets.
- Invisible zippers keep closures visually unobtrusive.
- Machine-washable covers are specified for indoor or outdoor use.
Cons:
- Pillow inserts are not included.
- Hand-sewn covers may vary by about 1 cm.
- The mixed artwork is less uniform than the ghost or lettering sets.
Best for: Shoppers who want several Halloween motifs, a white background, and visual variety across a coordinated group of covers.
Not ideal for: Buyers who prefer one repeating design, need precise cover measurements, or want a predominantly black spooky palette.
Bottom line: Choose this set when motif variety is the priority, while allowing for small handmade measurement differences and a brighter palette.
“Choose this set when motif variety is the priority, while allowing for small handmade measurement differences and a brighter palette.”
As an Amazon Associate we earn from qualifying purchases.
Before You Start
Decide on a spooky design before you cut: examples include pumpkins, bats, ghosts, black cats, moons, or a simple orange-and-black color scheme. For large motifs, position the fabric so the main image will sit near the center of the pillow front. Check directional prints and place the pattern upright. The measurements below make one cover for an 18-by-18-inch insert; repeat the cuts for a second cover. For another insert size, use its measured width and height in the cutting formulas in Step 2.
Keep seam allowances consistent at ½ inch. Press fabric on a setting suited to its fiber, and test the heat on a small scrap first. Keep fingers away from the needle while sewing, and unplug the machine before changing the needle or clearing a jam.
Step-by-Step Instructions
Step 1: Choose the fabric and design
Select washable, medium-weight fabric in a Halloween print or solid colors that coordinate with your room. Choose one fabric for the front and either the same fabric or a complementary fabric for the back. Buy enough to cut one front and two overlapping back panels for each pillow. For two 18-inch pillows, about 1¼ yards of standard-width fabric is usually sufficient, but check the print repeat and fabric width before purchasing. If the print has a clear top and bottom, mark the top edge on the wrong side with tailor’s chalk.
Tip: Avoid placing a large motif directly on the seam line; the stitching may cut through the face or key detail.
Check: You have enough prewashed fabric for all fronts and back panels, and you know which way each design should face.
Step 2: Measure the inserts and calculate the cuts
Measure each insert from seam to seam while it lies flat; do not stretch or compress it. For an 18-by-18-inch insert, cut one front square 19 by 19 inches. Cut two back rectangles, each 19 inches high by 14 inches wide. The extra inch on the front and the height of the back pieces allow for ½-inch seam allowances and a 5-inch overlap. For a different insert, cut the front to insert width plus 1 inch and insert height plus 1 inch. Cut each back piece to insert height plus 1 inch by roughly three-quarters of the insert width plus ½ inch; adjust the back-piece width so the two panels overlap by about 4-6 inches after sewing.
Tip: Measure every insert separately. Inserts labeled the same size can vary, and an oversized cut can leave a loose cover.
Check: Your cut dimensions are written down, including the front, two back panels, and ½-inch seam allowance.
Step 3: Cut and mark the fabric
Lay the fabric flat on a clean surface with the wrong side facing up. Align the ruler with the grain or print direction, then cut one front square and two back rectangles per cover. Mark each piece lightly on the wrong side as “front,” “back left,” or “back right.” If you are centering a motif, fold the front piece in half in both directions to find its center, then unfold it and mark the intended design position. Keep the cut edges square so the finished cover does not twist.
Tip: Use fabric weights or clips to hold slippery cloth. Avoid pulling the fabric while cutting, which can distort the edges.
Check: You have the correct number of neatly cut pieces, and directional designs point the same way.
Step 4: Finish the overlapping back edges
Take the two back rectangles and place each one wrong side up. On each rectangle, fold one long edge toward the wrong side by ½ inch and press. Fold that same edge by another ½ inch to enclose the raw edge, then press again. Stitch close to the inner folded edge with a straight stitch, backstitching briefly at both ends. These two hemmed edges will form the opening where you insert and remove the pillow.
Tip: Press the folds before stitching instead of trying to hold them in place by hand as you sew.
Check: Both back panels have a straight, secure hem along one long edge, with no raw fabric showing.
Step 5: Layer the cover pieces
Place the front piece right side up. Put one back panel right side down on top, aligning its raw outer edges with the front; its hemmed edge should point toward the center. Place the second back panel right side down from the opposite side. Align the remaining raw edges and overlap the two hemmed edges in the center by about 4-6 inches. Pin or clip around the perimeter, adding extra clips where the back panels overlap. Check that the front and back dimensions match at the corners.
Tip: Keep the hemmed edges facing inward. If they face outward, the raw seams may be visible on the finished cover.
Check: The right sides face each other, the raw edges align, and the two hemmed back edges overlap at the center.
Step 6: Sew around the perimeter
Set the machine to a medium straight stitch. Starting near a corner, sew around all four sides with a ½-inch seam allowance. Backstitch at the beginning and end. When you reach a corner, stop with the needle down, lift the presser foot, pivot the fabric, lower the foot, and continue. Sew across the overlap securely, but do not sew the opening closed beyond the perimeter seam. Remove pins or clips as you approach them.
Tip: Before stitching, confirm that the pillow can be inserted through the overlap. If the opening is too narrow, shift one back panel to increase the overlap opening while keeping enough overlap to cover the insert.
Check: A continuous seam holds the four outer edges together, and the back opening remains open.
Step 7: Trim, clip, and turn the cover
Trim loose threads. Reduce bulky seam allowances at the corners by trimming diagonally, taking care not to cut through the stitching. If the fabric frays easily, finish the raw seam edges with a zigzag stitch or a serger. Reach through the back opening and turn the cover right side out. Use a blunt tool, such as a knitting needle or capped pen, to gently push each corner into shape without piercing the fabric.
Tip: Do not cut close to the seam at the corners. Leave enough fabric to keep the stitches secure.
Check: The cover is right side out, its corners are shaped, and the seams remain intact.
Step 8: Press, insert the pillow, and check the fit
Press the cover lightly according to the fabric care label, keeping the iron away from any printed coating or decoration that could melt. Insert the pillow through the back opening, pushing the corners of the insert into the cover’s corners. Smooth the front, then adjust the overlap so it lies flat and fully covers the insert. Repeat the steps for the second cover.
Tip: A cover should fit snugly without forcing the insert through a narrow opening. If insertion is difficult, remove the pillow and widen the opening by adjusting the back-panel overlap before resewing.
Check: The insert fills the cover, the front looks smooth, and the overlapping back panels conceal the opening during normal use.
Common Mistakes to Avoid
- Cutting the front to the insert’s exact size leaves no room for seams. — Add 1 inch to both insert measurements when cutting the front for ½-inch seam allowances on all sides.
- The print runs sideways or the main motif ends up off-center. — Mark the print’s top direction before cutting and position large motifs on the front piece before trimming fabric.
- The back opening gapes or exposes the insert. — Overlap the hemmed back panels by about 4-6 inches and check the opening with the insert before finishing.
- The cover twists or has bulky, pointed corners. — Cut square pieces, align edges carefully, sew an even seam allowance, and trim corner bulk without cutting the stitches.
Troubleshooting
Problem: The pillow insert will not fit through the back opening.
Solution:
Remove the insert and check whether the back panels overlap too far. Unpick a short section of the perimeter seam if needed, reposition the panels to widen the opening, and resew the edge. Keep enough overlap to hide the insert when the cover is in use.
Problem: The cover looks loose or wrinkles around the insert.
Solution:
Confirm that the insert was measured seam to seam and that the cut dimensions were calculated correctly. For the next cover, reduce the finished dimensions slightly, but leave enough ease to insert the pillow without straining the seams. If the cover is only mildly loose, use a fuller insert or make a narrow adjustment seam along the sides.
Problem: The machine skips stitches or puckers the fabric.
Solution:
Replace a bent or dull needle with a new universal needle suited to the fabric weight. Rethread the machine with the presser foot raised, test the tension and stitch length on a scrap, and guide the fabric without pulling it. Use a fresh needle if the problem returns.
Problem: The corners look bulky or will not turn neatly.
Solution:
Turn the cover inside out again, trim excess corner fabric diagonally without nicking the seam, and turn it right side out. Shape each corner gently with a blunt tool, then press with a suitable heat setting.
What Success Looks Like
A completed cover has a centered, upright Halloween design, straight seams, and four shaped corners. The insert fits snugly without distorting the fabric, and the overlapping back opening stays closed and conceals the insert. The covers should sit flat on a chair or sofa, with no exposed raw edges at the back hem and no loose decorative pieces.
Next Steps
Check the fabric care label before washing, and remove the inserts first. Wash the covers inside out on a gentle cycle if the fabric permits, then dry and press them according to the label. Store the clean covers flat or folded with your seasonal decorations, away from damp areas. If you add felt shapes or appliqué later, attach them securely and test the finished cover for loose parts before use.
Frequently Asked Questions
Can I make these covers without a sewing machine?
Yes. Use a needle and strong thread with small, even backstitches, keeping the same ½-inch seam allowance. Hand sewing takes longer; reinforce the corners and the back-panel overlap with extra stitches.
Can I use an existing pillow cover as a pattern?
You can use it to check the finished dimensions, but do not copy the outside measurements without accounting for seam allowances. Measure the insert itself, then add the allowances described in Step 2.
What fabric works best for Halloween throw pillows?
Woven cotton and quilting cotton are easy to cut and sew, and many can be machine washed. Medium-weight linen also works. Check the label for washing instructions, and avoid very stretchy or slippery fabric for a first attempt.
How do I make the covers washable?
Use washable fabric and thread, prewash the fabric before cutting, and keep the design free of decorations that cannot be washed. The envelope back lets you remove the cover from the insert for laundering.
Fall Picks
fall essentials
As an affiliate, we earn on qualifying purchases.